
Slow/cumbersome typing to maximise memory via WHDLoad? Sod that! Time for my OWN quick menu...
All of the following is probably basic stuff for regular Amiga fans, but as it was all new to me I thought maybe I'll share my experience in case it helps others.Recently realised after regularly typing lots to launch games via WHDLoad and Shell prompt, why I don't I write my own boot sequence?! With my OWN short cut buttons! Is this even possible?
YES and I've written how I achieved it!
I'll point out now that even though I grew up with the Amiga, and yes tinkered around with coding/Workbench/Shell etc... it has now dawned on me, actually I just touched the surface of how the whole Amiga worked.
Lets get a Hard Drive... oh hello WHDLoad?
Always having had an Amiga 500, when I saw a cheap Amiga 1200 on ebay I couldn't resist getting it. OK it had a bust floppy drive, but that was easily sorted by buying one from Amiga Kit (http://www.amigakit.eu).No memory extension with just 2Mb RAM and no hard drive. After a bit of hunting around I purchased a Compact Flash card + connector from ebay to finally hook up my Amiga 1200 with a hard drive.
Took Amiga apart, fitted the Compact Flash connector, turned it on, BAM job done. It was at this point I was introduced to WHDLoad. Always having an Amiga 500, floppy disks were THE only way, (sure I bet you can by a CF connector today). I'm still not sure what a hard drive would have done back in the day, just one big floppy disk? to save games? backups? But now it turns out games and programs can be stored on the harddrive and launched via WHDLoad.
As my Amiga 1200 has minimal RAM, I can't launch WHDLoad games in Workbench itself, clearly not enough memory, so there is an option when I reboot my machine holding down the left mouse button launches a Shell window prompt. From here I have to locate the directory on the hard drive of the game I wish to launch then type out a command to launch it. As Workbench hasn't loaded yet, the memory is ready and waiting to load+launch the game.
Great!
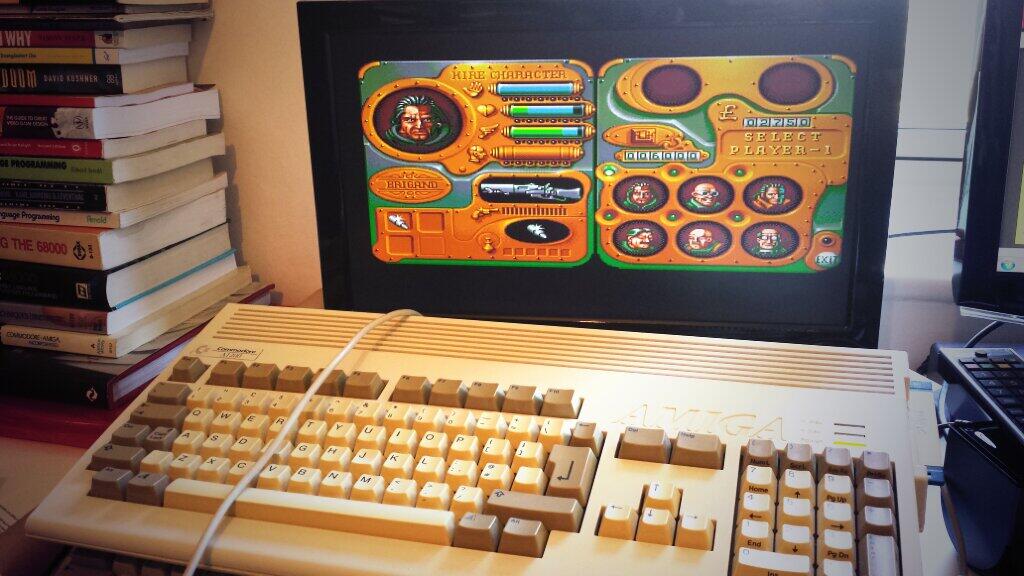 |
| My Amiga 1200 in action! (Chaos Engine) |
OK... my poor fingers!
Yes I do miss the Amiga keyboard, yes keyboards have come a long way since. When I want to simply launch a game, there's actually a lot of typing. Sometimes I have to double check the folder structure spelling, then locate the directory with the game in it. Then launch it. Yes, this IS straight forwards stuff, but feels like there's so much typing for such a simple task, especially for games I play over and over again.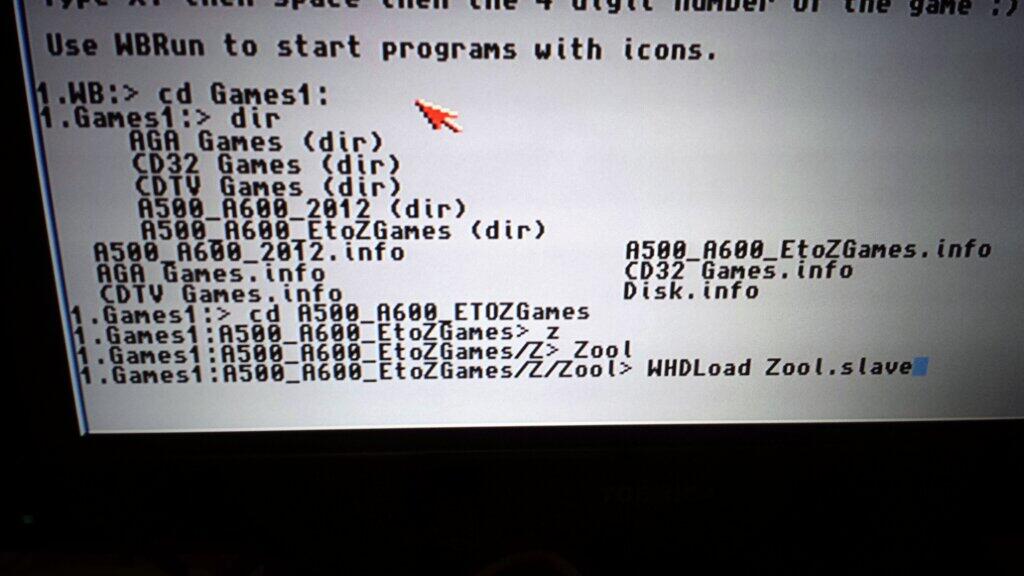 |
| A script has got to be quicker than this each time!! |
Let me introduce you to S:Startup-Sequence ...
When I reboot my machine and hold down the left mouse button, it interrupts the boot sequence and loads a bare minimum option menu so that memory is available to launch stuff. Being pretty naive, I thought this was something special with having WHDLoad installed. It's not.When I realised there MUST be a script somewhere that controls the boot sequence I started to ask questions on Twitter. As usual I was kindly pointed in to the right direction, and this is where I met S:Startup-sequence for the first time.
If you open the Shell in WorkBench you can type:
ed S:Startip-sequence
This opens the file in a basic text editor, here you can see each step in the boot up. After having a quick look around, I found this:
C:Bblank

C:GetMouseInput LOCAL

IF $MouseInput EQ 1
  Unset MouseInput
  C:SetPatch QUIET
  C:Assign >NILL: ENV: RAM:
  C:Assign >NIL: T: RAM:
  C:Execute S:Maxmem-Sequence
  EndCLI >NIL:
EndIF
From this small section of the whole script I could see that there's a check for the left mouse button, if it's pressed then it clears the memory, then executes another script called S:Maxmem-sequence.
Firing up Maxmem-sequence in the text editor, I could see the quick menu that I see when I reboot. Excellent, I can now see the commands to launch a window with quick options.
LAB Start

C:Requestchoice >ENV:Choice "Maxmem-Sequence""Choose:""RADboot""KGLoad""Reboot""Prompt"

IF $Choice EQ "1"
  Skip RADboot
ENDIF

IF $Choice EQ "2"
  Skip KGLoad
ENDIF

IF $Choice EQ "3"
  Skip Reboot
ENDIF

IF $Choice EQ "0"
  Skip Prompt
ENDIF
Above you can see the script pops up a window with 4 options, there are then some basic IF statements to work out what the user selected. Interestingly the last button has the ID of 0.
Lets make our own script
I had to do some googling regarding Shell commands and running scripts on the Amiga.This link is a great reference for AmigaDos:
http://winuaehelp.back2roots.org/background/amigados.htm
Scripts can be created by creating an empty text file using the regular text editor, then on each line use the AmigaDos commands just the same as if you were typing in a Shell window.
FACT: After 20+ years of using the command, I've only just realised the the Shell command CD means Change Directory.
Once you have created your script file and saved it, you have to change the protection settings of the file to be able to run it as a script.
So if you have created a new script file called "myscript" in the S: director, then open the Shell window and type:
protect S:myscript RWES(For info: r=read, w=write, e=execute, d=delete, s=script, p=pure)
From a shell prompt you can now type: myscript and it will run. Great!
I created my own script called RichMenu which prompts the user with a window with options of quick shortcuts to games. Using what I had just learnt this was easy, then for each option in my script all I have to do is change directory to the games' folder then call WHDLoad, as a quick example this is my script:
LAB Start

C:Requestchoice >ENV:Choice "RichMenu""Choose:""Zool""Chaos Engine"

IF $Choice EQ "1"
  Skip Zool
ENDIF

IF $Choice EQ "0"
  Skip Chaos
ENDIF
LAB Zool
CD Games1:A500_A600_ETOZGames/Z/Zool
WHDLoad Zool.slave
EndCLI >NIL:
LAB Chaos
CD Games:A500_A600/c/ChaosEngine
WHDLoad ChaosEngine.slave
EndCLI >NIL:
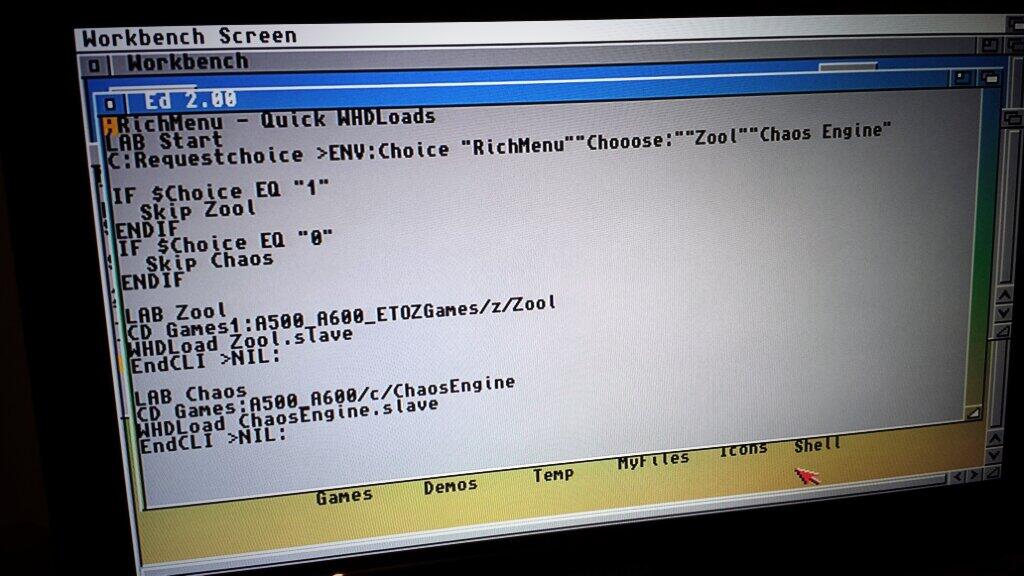 |
| Editing the RichMenu script |
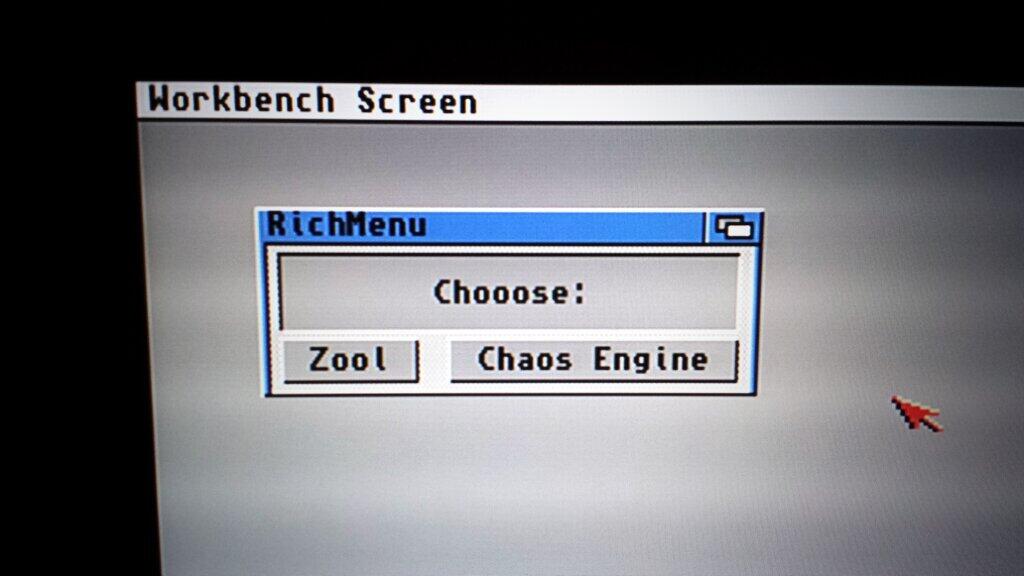 |
| IT WORKS! |
Here's a snippet of the new change:
LAB Start

C:Requestchoice >ENV:Choice "Maxmem-Sequence""Choose:""RADboot""KGLoad""Reboot""Prompt""Rich Menu"

IF $Choice EQ "1"
  Skip RADboot
ENDIF

IF $Choice EQ "2"
  Skip KGLoad
ENDIF

IF $Choice EQ "3"
  Skip Reboot
ENDIF

IF $Choice EQ "4"
  Skip Prompt
ENDIF
IF $Choice EQ "0"
  Skip RichMenu
ENDIF
...
LAB RichMenu
C:Execute >NIL: S:RichMenu
EndCLI >NIL:
To summarise
- S:Startup-sequence checks to see if left mouse button is down.
- If it's down then clears memory and calls, S:Maxmem-sequence
- S:Maxmem-sequence has been updated with an extra option called "Rich Menu"
- When "Rich Menu" is selected it calls the script called RichMenu
- RichMenu contains shortcut options to popular games I play, when a game is selected, it changes directory to the selected game, then game is launched with WHDLoad
- Lots of fun had
And that's it! I hope this makes sense, and someone one day might find it useful!
Comment here or get involved on twitter: @rich_lloyd
